- Telnet
- Packet Engine
- Maps
- Transmission of DxSpots
- Dx Announcement
- Station Settings
- Bands
- Tranceiver Control
- DataBase
- Call Search Services
- QSO Panel
- Telnet View
- DxCluster View
- FT8 View
- Earth Map View
- Great Circle View
- DXCC View
- Memo View
- Dx Calendar View
- Tranceiver View
- Logbook View
- Tranceiver View
- Tranceivers View
- CW Panel
- Parrot Pannel
- Open Windows Arrangement
- Close
- Save Windows Arrangement
- SaveAs Windows Arrangement
- Check For Updates
- Account
- Technical Support
- Report a Bug
- Web Location
- Database Maintenance
- Easy/Expert Mode
- LogBook Properties
- DxDozer Options
- Help
- Exit
Introduction.
DxDozer is an advanced DX Logging Application. It is suitable for beginners and for experienced Dxers. The name means that removes any obstacles that may prevent you for 'doing' that DX like a BullDozer.
System Requirements.
Needs Windows 10. It will work also under Windows 7 but not under XP. Needs Internet connection at least for the first time setup.
Installation.
Download the Program from www.dxdozer.com You will download the file 'dxdozer.zip'. Unzip and run (double-click) the DxDozer.msi file to start the installation. The Installer will ask your permission to continue because will save the program to Program Files. Follow the Installation wizard steps and you are Ready. You will have a Desktop shortcut and a shortcut in your Start Screen. The Program will be installed in 'Program Files (x86)/DxDozer' Folder. It will create also a Folder in 'Documents/DxDOzer' where will store your QSOs Database and other useful files.
First Run Wizard
After the Installation starts the Setup Wizard. It has 8 steps.
- First asks you to create a WEB Account to www.dxdozer.com. To use the Program you MUST HAVE a www.dxdozer.com Account.
- The next wizard asks you to select the Database type you wish to use. Click the [Default] if you are not sure what the rest entries are. If you have SQL Server you may wish to use it, or if you are going to run as a group of operators then Select an SQL server. Even the default Database which is MDB file allows up to 5 concurrent connections.
- Next Step is the Logbook Header Setup, You set your Callsign and your coordinates. Coordinates are important for various calculations.
- Next step is the definition of 10 user fields. Those 10 fields are Logical fields and the values can be either true or false (yes or No). For instance you decide to name the second field '3 Element Beam' if you log a QSO using that Beam you can set this field to true bu checking it. You can name them later from 'Logbook Properties'.
- Next step is the LOTW credentials ,if you are a registered LOTW user. (You should be!). Check the image for the Station Location field which is mandatory.
- Next step is to create the Logbook Tables in the Database using the data you entered so far.
- After that the next step will update the DXCC entries/Countries. The operation needs Internet connection.
- The Wizard continues with LOTW and OQRS users update
-
Finally you can import your QSOs from your outdated Logbook program if you have an ADIF file. You can bypass it and do it later.
It is important to import your QSOs if you wish to have correct DxCluster marking. - Now you are ready for your first program run.
First Run
The program runs and you see on top the Ribbon, below the tan strip and the Views, Below the views is open the 'QSO Log' Panel and below it the Status bar.
On the left are 3 other panes 'Map Legend','Parrot' and 'CW'.
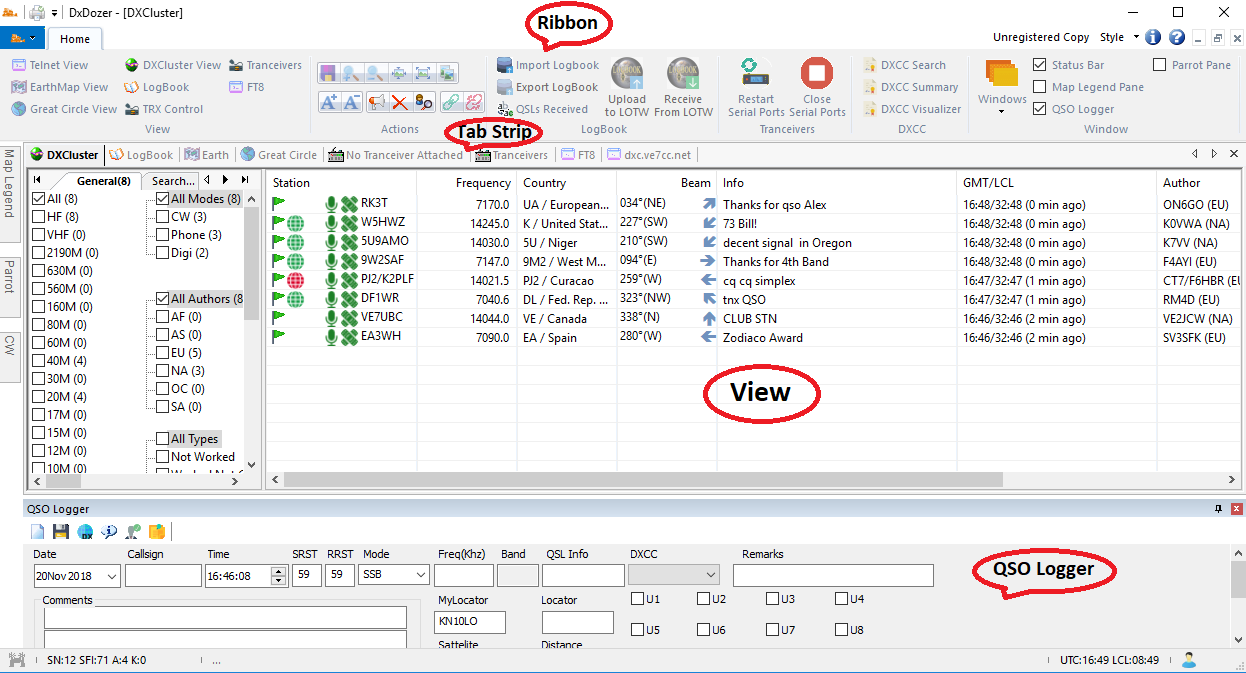
UI Layout
The program has two different modes of operation. "Easy Mode" and "Expert Mode". In easy mode there are available only most used operations and the Ribbon bar has only the necessary buttons.
Expert Mode

The Ribbon although looks like the one in easy mode actually has a lot of tabs with dedicated operations.
The ribbon different tabs are HHome,Logbook,DxCluster, Telnet/Packet, Maps, WEB, Transceiver Control,Calendar,Awards
Be aware that Many Buttons are disabled until you are in the proper view.For instance if you check the dxClsuter ribbon tab you will see the 'Ask DX' button grayed out, unless you select as telnet view. Because
the command will be send to the selected dxcluster telnet connection. You may be connected to multiple dxclusters.
Maintenance and Backup
Backup Depends on the Database you selected to use. If you selected the default MS Access Database then you need just to copy the database file
AGWLOG.mdb to another disk or stick to backup your data or to transfer them to another computer.The Database file is in Documents/DxDozer folder
If you selected SQL server then you know how to backup.
Another option is to export all your QSOs to an ADIF File from menu LogBook/ExportLogbook. Need first to go to Expert mode menu.Then Go to Logbook view
and from menu Logbook/Select All select all your QSO and export to both ADIF and "Internal format". Then keep those file to another media.
Maintenance is needed if you imported your QSOs from another Logbook and you find that some entries have wrong band or mode.
DxDozer will try to fix mode and Band from the QSO frequency. It will try also to analyze the Callsign and find the right DXCC Country.
Options.
Telnet
It lets you select the font and font size to use on every telnet View.
You can change the Font Size from inside the telnet view using the Ribbon Home Menu buttons 
Packet Engine
Packet Engine is used only to get DXCluster Spots and transmit to Packet ,DxCluster spots received from telnet. Here you configure how to use Packet Engine. If Packet Engine Runs in the same computer then leave it as is the default settings are OK. Just enter your CallSign. The color of the header of received Packets can be changed and also the size of the Fonts.
Maps
The Maps options has two different (same) settings for Flat earth map and Great Circle map. On the map view you can see the DxClsuter received DXSpots. More on the description of the Map View. You can set the colors and font of the text for the DX Calls label on the map. DxDozer displays the DxSpots and draws propagation Lines from the Author of the dxSpot to the DxStation. You can use different line colors to distinguish the bands of operation. In General default settings are OK.
Transmission of Dx Spots
If in your area are HAMs that want to receive DxClsuter Spots via Packet, after all DxClsuter over Telnet is not so HAM(!!!), you can transmit the dxspots you receive from telnet to PAcket Network using Packet Engine. You can specify here the Callsign to use over the air and if needed any digipeater.
Dx Announcement
Here you define the way you wish to be notified of new incoming dxClsuter spots. If you choose 'Voice Announcements' you will hear from your PC the DXCall either as letters or using Phonetics like 'Siera','Victor' etc Visual announcement will display a small windows or your right lower corner of the main display with the DXCall for a few seconds. If you choose 'flash TaskBar' will flash the program tab in the task-bar 3 times.
Station Settings
Define your Call locator and coordinates, select also the units type. Preferred Startup Mode is the mode that the QSO panel will be filled when you don't have a transceiver attached.If you are a CW fun the set CW.
Bands
Band Edges are used in the DxClsuter view(s) to sign the dxspot mode. DxSpots do not contain mode info, so the mode is extracted from the frequency of operation. If, for instance, the frequency is 14001Khz then is CW. You can define the band edges.In most cases the edges are fine and in future versions you will be able to download updated band edges from dxdozer.com. You define here also the CW edges and the start/end of digital modes. In the Digital Modes sub view you can set the frequencies used for digital modes. FFor instance if the DxSpot frequency is 7074Khz then is FT8.
Transceiver Control
Here you define the transceivers to control from DxDozer.
For a new TRX press the [New Trx] button.
In the dialog Select first the Radio's model. If you wish to share the Radio with other programs like WSJTX then from the list select
'TCP/IP HamLibNet'.To use this feature you should configure first the HamLibNet Program which has been installed with DxDozer and is in the same directory.
Program Files (x86)/AGWSoft.DxDozer.In brief HamLibNet is a Windows Version of HamLib's 'rigctld' written by me.When HamLibNet runs it controls your
radio(s) and then both DxDOzer and WSJTX can use the same radio simultaneously without conflicts.
CAT using HamLibNet (TCPIP).
In the Computer field set the TCPIP Address of the computer where HamLibNet runs. The default value of '127.0.0.1' is the local Computer.
In the Port field enter the Port number your Radio uses. You can see the port Number in the HamlibNet list of radios.
CAT using Serial Port.
Select the serial port your Radio is connected. By default all other parameters are correct except if you changed them from radio's menu.
The 'DTR On' and 'RTS On' in most cases are used for PTT and CW, so its safe to not change them to On unless you know why.
Select then from the List the Transceiver's model. Double click each column to
select the Serial/Usb port the transceiver is connected ,baud-rate and stop bits. If your transceiver is not in the list use a
Generic Brand model or Ask me to write the interface file for your transceiver, from the www.dxdozer.com support page.
To Remove/Delete a transceiver entry select the transceiver and press the [Delete] button.
If you have more than a Transceiver connected then Press the [Bands] button to define which bands each transceiver uses.
Lets say that you have an HF transceiver for low bands 160m,80m and 40m , another for the rest HF bands and another transceiver for 2m and 70cm Band.
If you see a DxSpot for 80m and double click on it in DxClsuter view, you can define here to jump to that frequency the first transceiver.
If the DxSpot is for 15m band then will set the frequency to the second transceiver and if it is for 2m then the third transceiver.
Database
You can define, if you want, to protect your Logbook from unauthorized usage using a login/Password screen.
You can change the database Server in use by choosing a different server.You may wish to connect to a database server in another computer or on the Cloud.
Do not touch it unless you are very sure.
BTW try to get regular backups of your database to another computer or on the Cloud or on USB Sticks.
Call Search Services
You can use a webservice to find Operators info like Name,address etc for QRZ.com if you have a subscription or from HAMQTH.com for free. Just enter the login/Password for the web service. Perhaps is a good idea to create an entry for your call the free WebService HAMQTH.com
Logbook Properties.
You can change your Logbook properties at any time from File Menu. The dialog has 4 Tabs (Panels).General
Callsign The callsign you use to log QSOs.
Owner To Whom the Logbook belongs. e.g if you have a special call then Enter the special call to Callsign field and your call to this field.
Description Describe the Logbook. E.g Main Logbook or special event station to celebrate etc etc
Locator and Coordinates The place where you operate. If you Know the locator and not the Coordinates enter locator and press the calculate Button to calculate coordinates
and vice-versa
QSOs
It displays the QSOs logged so far and dates of the first and last QSO.
User Fields
The Logbook has space for 10 user fields. You can assign any name you wish to each field. For instance you can define the transceivers you use for each QSO. You may wish to enter the power in use for each QSO. All these fields are Logical. The can accept Yes(TRUE) or No(FALSE).
LOTW
You enter here your LOTW credentials. Password is saved in the database encrypted
LOTW is used to upload QSOs ,receive QSOs confirmed etc.
There is an image where you can see what you need to enter to 'Station Location' fields.
Views and Panels
DxDozer has many different views and a few side panels.Panels can be docked on any side of the main Window and can be either always open or automatically collapsed to not occupy space.You use the Pin on the top of the panel to manage visibility. To move a panel first press the pin and the drag the panel header and move it any where. You can left the Panel 'Floating' over any window.
QSO Panel
The most important Panel.By Default the panel is opened on the bottom of the main window. It has a toolbar and the fields necessary to enter a QSO. The necessary fields to Log a QSO are Callsign, Date and Time, Frequency and mode. All other fields are optional.
Tip to Log QSO Enter the call of the Station and leave the cursor in the Callsign field while calling the Station. If there is a pileup then you may do the contact after a few minute or even more. When the DxStation answers you then move the cursor from Callsign field to
any other field. Automatically the Time will be set to Current time. You can do it many times. Each time you move the Cursor from Callsign field to any other field the Time field is update with the current time.
For Contests if you enter a number inside the 'Contest SND' field then every other QSO the number will be increased by one. To stop this just erase the field.
Contest operation is not suitable if you intend to run a Contest, but if you find dx stations during a contest and wish to work them. Later you can export this QSOs and send to Contest Authority to validate QSOs.
to Log the QSO and save it to database press the Save button  on the QSO panel Toolbar.
Sattelite QSO
If you work a Sattelite QSO then you must enter the Sattelite name in the 'Sattelite' field. The Sattelite name must be in the format 'Sattelite Name' 'Sattelite Mode'. e.g 'AO-21'.
You should select the Sattelite mode VU,UV etc and set the Propagation mode to 'SAT'.
That way the QSO will be uploaded correctly to LOTW.
QSO Panel ToolBar
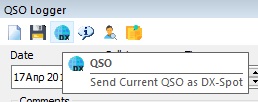
If you rest the Cursor on top of each toolbar icon you will get the information tooltip. In brief you can clean the QSO fields, Save the QSO to database(Log),Spot the QSO details to DxCluster,See the DXCC status for this DXCC country and also previous QSOs with the same station,Check the Station on QRZ and turn on or Off the tooltips.
Telnet View
Telnet View is used ,mainly, to connect to DxClusters. You can open and connect to many different clusters simultaneously. In the DxClsuter view you will see the source of each spot.
The View is divided into two panels (upper and lower) the upper panel displays the received data from the server and in the lower panel you can type and send the data to the server each time you press enter.
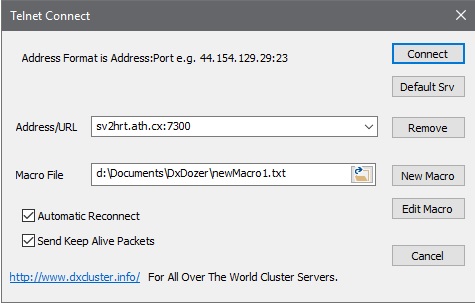
DxCluster View
Probably the most important view and quite complex (hi,hi), The view designed to show you with just a glance what happens.
Left Side-General
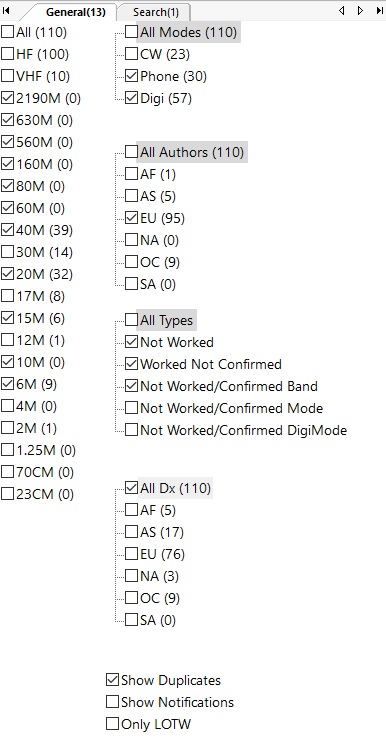
Worked Not Confirmed you will see spots with stations that you worked before but you haven't QSL in any band any mode.
Not Worked/Confirmed Band you will see spots with stations that you hadn't worked or Confirmed in this Band.
Not Worked/Confirmed Mode you will see spots with stations that you hadn't worked or Confirmed in this mode any band.
Not Worked/Confirmed DigiMode you will see spots with stations that you hadn't worked or Confirmed in Digital mode any Band.
Left Side-Search

FT8 View (Integration)
Probably the most important view for FT8/4 Users. The view designed to show you with just a glance what happens while working on FT8.
You must configure properly the WSJT-X software.
While the WSJT-X receives the received stations are displayed in this View and you can check which station you need to work, if they have LOTW or OQRS etc.
From the left side tree you can select the type of stations to Display.
When you decide to work a station you just double-click it in this View and WSJT-X starts to call him.
You can run many copies of WSJT-X with different Transceivers. DxDozer sends the commands to the proper WSJT-X/transceiver.
Last and Important is that When you finished a QSO then the QSO is automatically logged to DxDozer.
WSJT-X Setup
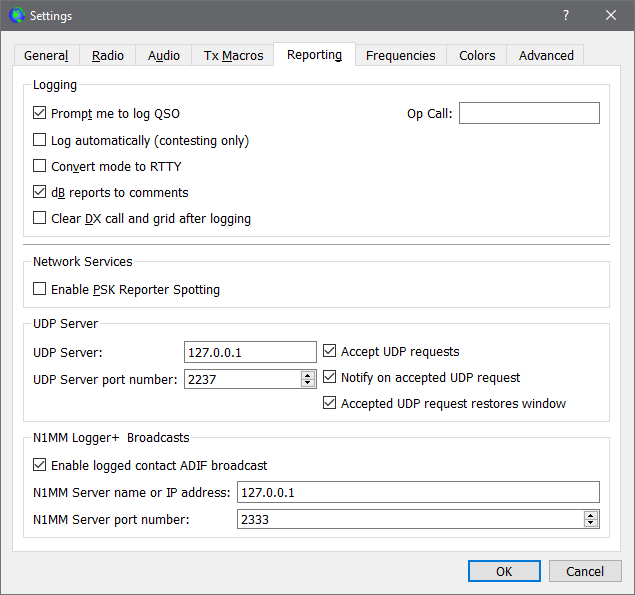
- You must Enable UDP Server. Is the mid section in the settings.Enable it to receive stations from WSJT-X and be able to ask WSJT-X to start QSO with a Station from DxDozer FT8 View.
- You must Enable 'Enable Logged contact ADIF broadcast'. In the bottom section. That way QSOs you made will auto logged to DxDozer.